

If you’d like to start at the beginning, go ahead and read the introductory post: Your Complete Guide To… Maps on The Mac – Part 1
In this post we’re going to focus on some of the ways you can use Maps to make life a little easier.
Get Directions
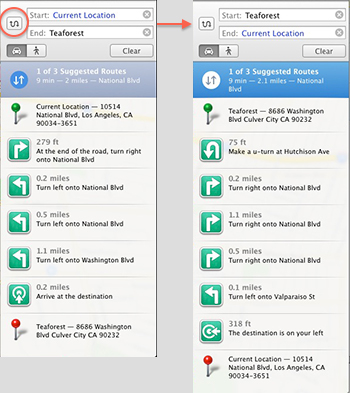
Getting directions in Maps couldn’t be simpler.
- Click the Directions button in the top-left hand corner of the Maps toolbar.
- A sidebar opens on the right.
- Make sure the car icon is clicked. Only click the pedestrian icon if you want walking directions.
- Enter the Start location. The default is the Current Location, but you can choose Home, or begin typing to choose a business, street address, or address from your Contacts.
- Enter the End location. Again, you can choose Home, or begin typing to choose a business, street address, or address from your Contacts.


- In the sidebar, in front of the Start and End fields, you’ll find a twisted arrow. Clicking this arrow reverses directions giving a map that takes you back to your starting point.
- Once your happy with your map, click File in the menu bar to Export As A PDF… or Print. We’ll look at other sharing options below.
- At any point you can hit the Clear button in the sidebar to start again.
Unlike Google Maps, you cannot create directions that involve multiple stops or multiple journeys. Hopefully this will be addressed in the future.
Display Traffic Updates
You can turn on Traffic Updates by clicking the small car icon in the top-left hand section of the Maps toolbar.
Maps provides real-time traffic updates. Currently, my understanding is that Apple source most of their traffic flow data based on the movement of user devices that have location services turned on.
Orange dots indicate slow traffic, while red dots indicate stop-and-go traffic. Maps also provide markers to indicate road closures, construction, and accidents. Click on these for more information.
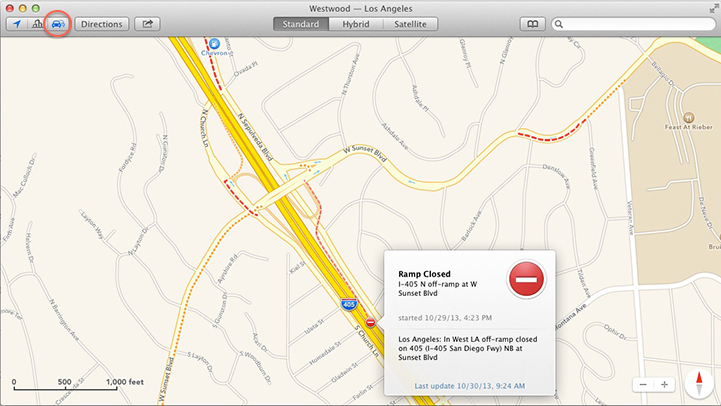
If you zoom in close enough, you can tell the traffic status for each lane.
Apple Maps is meant to reroute drivers around areas of traffic congestion, but I haven’t seen any reports of it working. Send us a comment if you’re the first to successfully try it out.
Search For Points-Of-Interest
Using the search field at the top right-hand corner of the Maps toolbar provides a wealth of potential data.
Center the map on any area you are interested in or click the Current Location tool to center on your current location.
In the search field type restaurant, coffee shop, gas station, or florist and hit enter. A rain of red pins will drop onto the map showing businesses in that category that surround you.
You can search for anything.
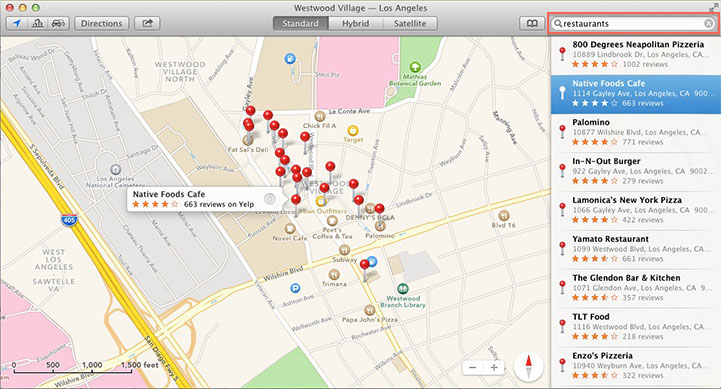
The searches list alphabetically in the sidebar.
Clicking on any location in the sidebar will highlight it on the map and reveal a title strip.
Click the i and the title strip rotates to reveal a card with: a complete address, phone number, home page, Yelp reviews, photos, and the option to Share with friends, Add to Contacts, Add Bookmark, Get Directions, or Write A Review.

Choosing to Get Directions will immediately get directions from your Current Location to the chosen location.
Drop Pins
If you want to mark an area of interest, you can drop a pin:
- Right-Click or Control Click on your mouse and select Drop Pin.

- A purple pin drops and the current address it landed on.
- Click to drag the pin to the correct location.
- Click the i and the pin’s title strip rotates to reveal a card with: Add Bookmark, Get Directions, Remove Pin and Report A Problem.

- If you’d like to keep this pin and rename it click Add Bookmark. I will show you how to do this in the next section.
It’s worth noting that you can only ever drop one pin on the map. If you want to mark several locations, drop a pin, click Add Book Mark, and then repeat the procedure as may times as necessary.
Bookmarks
You can Add A Bookmark in several ways:
- On the red pin for any location click the i and the title strip rotates to reveal an option to Add Bookmark.
- On a purple pin click the i and the title strip rotates to reveal an option to Add Bookmark.

- In the View Menu, choose Add Bookmark or Command D. This is best for making a bookmark that is a snapshot of Directions.
- Choose Add Bookmark from any of the Share icons.
Once you add a bookmark, it is added to the Bookmarks section of your Map Contacts. This is the small open book shaped icon on the top-right hand of the Maps toolbar.
Click on this icon to reveal your bookmarks.

Clicking any bookmark will immediately take you to that location on the map.
Click the Edit button, to change the names of your bookmarks. Click Done when you are finished.

You can also delete any bookmarks you no long need,
Share Maps Information With Others
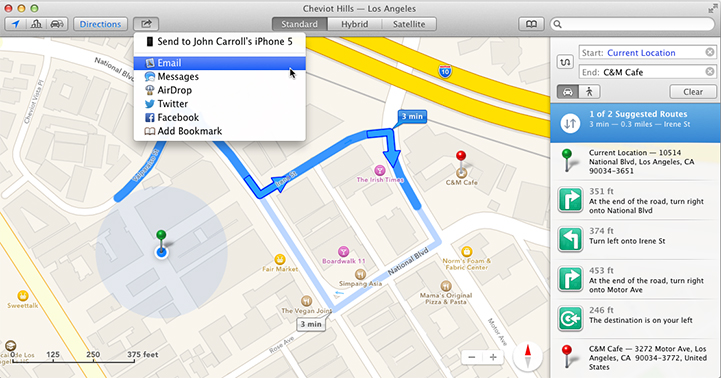
The Share icon appears in two places in Maps:
- On the left-hand side of the main Maps toolbar.
- On the top right-hand corner of location title cards.
Clicking on a share buttons lets you send: directions, standard maps, satellite maps and views of the city you like to your friends via Email, Messages, Twitter or Facebook.
As long as these services are set up on your Mac, you can send with the click of a button.
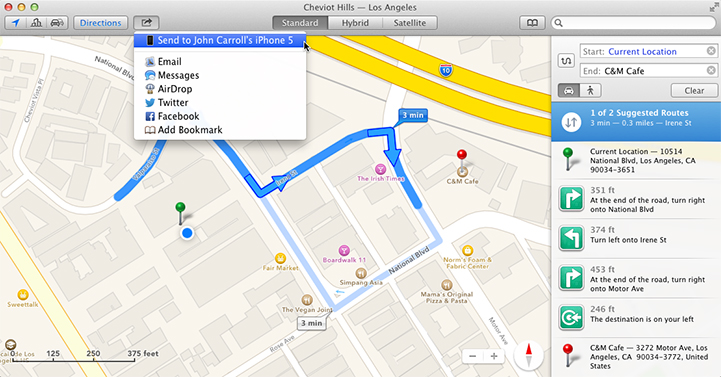
Share Maps Information With Your Own iOS Devices.
One new feature Maps brings is the ability to transmit information from your Mac to any iOS device that’s signed in under the same Apple ID.
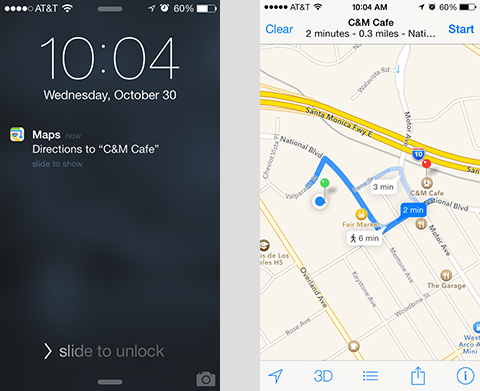
After getting directions for a restaurant, I can click the Share icon in the Maps toolbar and Send to John Carroll’s iPhone 5.
When I open my iPhone 5, the directions are there. All I need to do is press Start to begin navigation.
As you play around with Maps, you’ll find other features we didn’t have time to cover here.
Don’t keep them to yourself. Leave a comment below!
Have a great weekend. At least it won’t be directionless.
Live in Los Angeles County and need Mac, iPad. or iPhone help, training, support, service, repair, or just want some questions answered…
Call me at 310-621-5679. I come direct to you. That’s as stress-free as it gets.


Do you know if the standard purple pin for bookmarks can be changed to a different coloured pin or a different icon?
I imagine they can with a Terminal command, but I’ve no idea what that would be. Alternately, you could check out this German mobile software which appears to give more pin options. I have not used it so I can’t vouch for it. Good luck. – John
How do you set route instructions to display route numbers instead of street names?
Hi Walter – As far as I am aware, this is not year an option in Maps. You can use this for to suggest this feature to Apple – https://www.apple.com/feedback/ – John
“Getting directions in Maps couldn’t be simpler.” Wrong. It could be simpler. If you know how to get to Point A, and now you want to know how to get from Point A to Point B, it should be a simple matter of clicking on Point A, telling the app you want directions, and then clicking on Point B. It is that simple in Google Maps. It is not that simple in Maps on the Mac.
It doesn’t have that feature, but… you can right or Control click anywhere on the map and choose to Get Directions to that point from your current location. It’s a single click process.
Tried to print a map but only a few of the names that appear onscreen print out. How do i get all names to print? Also, can I make street names larger font?
Thanks,
Chris
Hi Chris – The only way to get street names to print is to double click to make the view larger. Even when you go to print the street names may not show up.
A good way to check if street names will show on a printed map is to use the option, File > Export to PDF and check the PDF in Preview. If they show up, you can print direct from the PDF.
You can make the street names bigger (but not by a huge amount) by selecting View > Labels > Use Large Labels
Hope this helps.
John
wow, very helpful info. Im trying to delete a pin and location from my “directions” locations. your instructions were: “Click the i and the pin’s title strip rotates to reveal a card with: Add Bookmark, Get Directions, Remove Pin and Report A Problem.” Only I get the following: “Add Bookmark, Get Directions, ADD TO CONTACTS and Report A Problem”. What happened to “delete pin”?
Hi Carol – The options may vary depending on your version of OSX. try selecting the pin and hitting the delete key. – John
Have you ever run across the problem with Maps where the “Current Location” is incorrect? About a month ago I moved from Michigan to Florida. Naturally, being new here, I use Maps a lot to tell me how to get places & how long to allow. However, the Maps program still thinks I’m in Michigan! Any tips on correcting that?
Thanks for the other very useful info!
Denise
Hi Denise
If this is on a Mac, go to System Preferences and click on the icon for Date and Time, the select the Time Zone tab. It’s possible the city and state were set manually when the Mac was first set up. If you click the button “set time zone automatically using current location.” it should fix the problem in maps. Let me know how it goes. Thanks for reading – John
In my neighborhood there’s a walking path (a real official one, paved, with hand rails and steps) that is an important pedestrian shortcut between streets. However Apple Maps doesn’t show it and doesn’t take advantage of it when showing walking routes. How can I add that walking path to the map?
Hi Bruce – From the research I’ve done, you can only send Apple Map data via an iPhone or iPad. Launch Maps. Drop a pin where the path is. Tap the pin and the third option is Report A Problem. Just follow the prompts and you can get the data to Apple. – John