If you have an iPhone or iPad, you’ve probably used Maps.
OSX 10.9 Mavericks finally brings Maps to the Mac. It’s a great application with lots to offer.
This two-part guide is designed to introduce you the Maps interface, available features, show you to get directions, display traffic updates, find points-of-interest, drop pins, navigate 3D city models, and share information with others and with your own iOS devices.
The Maps Control Interface
Open Maps by double clicking the Maps icon in the Dock. If Maps is not in the Dock, you’ll find it in the Applications folder.
Make the Maps window as large as you can to take full advantage of your screen size.
If you’re familiar with Maps in iOS7 you’ll recognize several of the icons.
Controls on the Toolbar:
- Current Location – Click to show and center the Map on your current location.
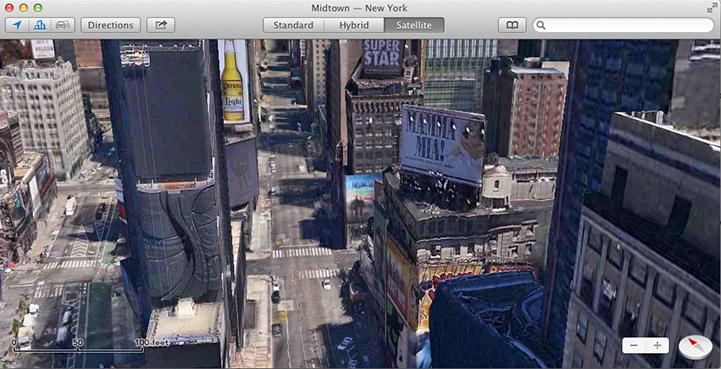
- 3D – Toggle the Map between 2D overhead view and 3D view.
- Show Traffic – Show real-time-traffic conditions.
- Directions – Click to open the Directions sidebar. You may enter a Start and End location, reverse directions and specify walking or driving.
- Share – Click to Add a Bookmark or share Map information via Email, Messages, Airdrop, Twitter or Facebook.
- Standard – Standard Map view with street outlines and points-of-interest.
- Hybrid – Combination of Standard Map and Satellite view.
- Satellite – Satellite view.
- Contacts – Search Contacts and Bookmarks that have been added from Maps.
- Search – Search an online database of businesses, map related queries, street addresses, and contacts.
Controls on the Map:
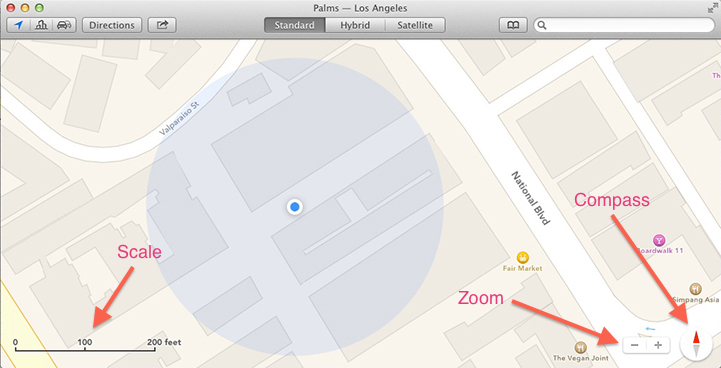
- Scale – Toggle on or off from the View menu. Shows the current Map scale. Can be very useful.
- Zoom Out – Hit the – button to Zoom out from the Map.
- Zoom In – Hit the + button to Zoom in from the Map.
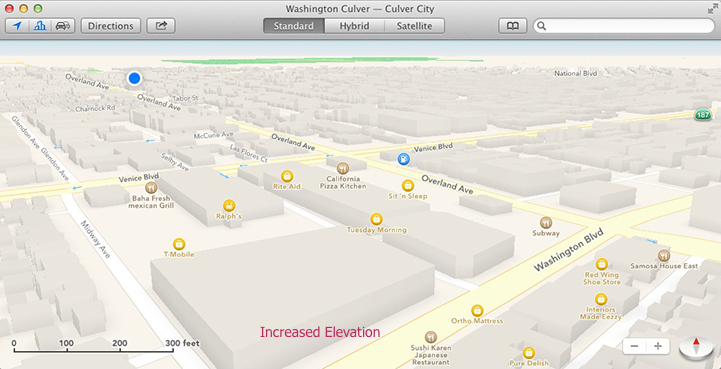
- Compass – Snaps the Map to North. Toggles between overhead view and angled view.
View Menu Options:
Using the View menu in the Menu bar gives access to some other
useful navigation options.
- Hide Scale – Show or Hide the current Map scale.
- Labels – Choose to “Always show Map labels in English” and/or “Use Large Labels” that are easier to read.
- Drop Pin – Add personal push-pins. We’ll discuss this more in Part 2.
- Add Bookmark – Add bookmarks of places that interest you. Bookmarks are stored in contacts in the toolbar.
- Enter Full Screen – Use to enter full screen mode. If you don’t understand full screen mode, leave this option alone.
The Maps Information Interface
Site icons on the Map:
Maps includes common color schemes to indicate highways, roads, forests, parks, lakes and oceans.
Maps also includes a large number of icons that indicate restaurants, bars, coffee shops, hospitals, libraries, schools, post-offices, auto-shops, gas stations, markets and stores.
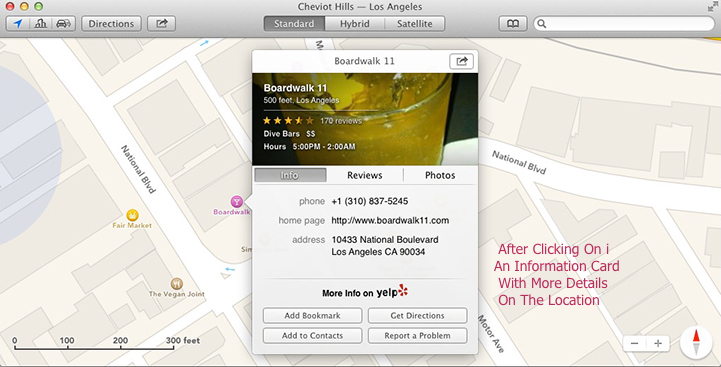
Click on one of these icons to reveal a title strip with the location name and the letter i inside a circle.
Click the i and the title strip will rotate to reveal a card with: a complete address, phone number, home page, Yelp reviews, photos, and the option to Share with friends, Add to Contacts, Add Bookmark, Get Directions or Write A Review.
Navigating The Map – Let Your Fingers Do The Walking
Once you open Maps, you can move N,S,E and W using two fingers to scroll on a trackpad.
Double tap with a single finger to Zoom in. You’ll be surprised how close you can get.

Double tap with two fingers to Zoom out.
Once you enter 3D mode, you can control the angle of elevation by holding down the Option Key and moving two fingers up and down on a trackpad.
To rotate your viewpoint, simply rotate two fingers on the trackpad.
Map Actions – Other Great Features
- Open Multiple Windows – Planning a complex trip? Open multiple Map windows to layout your entire itinerary.
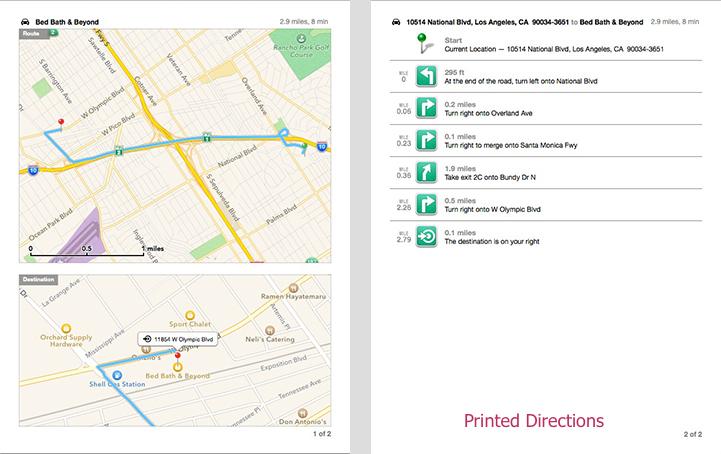
- Print – Under the File Menu. Print Directions and you’ll get a large scale map of your entire trip, a close view of the last turns to your destination, and a clear turn-by-turn list from start to finish.

- Export As PDF… – Under the File Menu. Saves the above Map as a PDF file.
- Copy And Paste – Under the Edit Menu. Copy and paste Maps or directions into documents. You can even edit and annotate these Maps in Preview.
- Report A Problem… – Under the Maps Menu. Quickly report any Map or navigation errors to Apple with the click of a button.
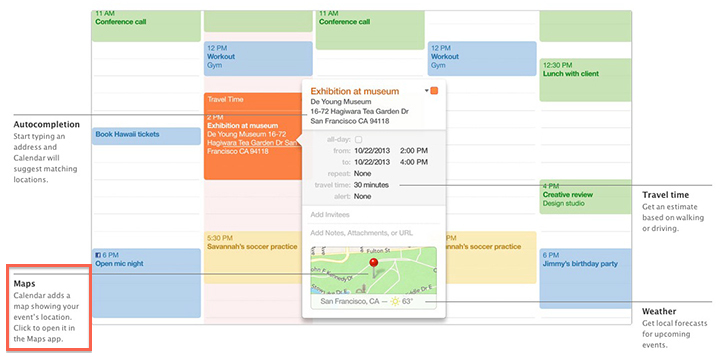
- System Integration – Maps are integrated in OS X apps. Mail, Messages, and Calendar automatically detect addresses and can display them in inline maps. Clicking an inline map opens the location in the Maps app.
- iCloud Integration – Bookmarks and recent searches are pushed to all your devices via iCloud so you can search for places on your Mac and have them available on your iPhone, iPad, or iPod touch when you’re on the road.
What’s Coming In Part 2
On Thursday we’ll take what you’ve learned here and use it to:
- Get Directions.
- Display Traffic Updates.
- Search For Points-Of-Interest
- Use Drop Pins
- Add Bookmarks.
- Share Maps Information With Others.
- Share Maps Information With Our Own iOS Devices.
Until then, have a terrific week.
You can read the second part of this guide in – Your Complete Guide To… Maps on The Mac – Part 2
Live in Los Angeles County and need Mac, iPad. or iPhone help, training, support, service, repair, or just want some questions answered…
Call me at 310-621-5679. I come direct to you. That’s as stress-free as it gets.


